Per importare massivamente dati in Salesforce è possibile usare o Data Loader o le Bulk Api.
Data Loader va bene se i dati sono poche centinaia o poche migliaia. Ma se i dati sono migliaia è sicuramente meglio usare le Bulk Api.
Proprio oggi fatto un test seguendo la guida in Trailhead
Bulk API and Asynchronous Requests
Bulk API is based on REST principles and is optimized for working with large sets of data. You can use it to insert, update, upsert, or delete many records asynchronously, meaning that you submit a request and come back for the results later. Salesforce processes the request in the background.
In contrast, SOAP and REST API use synchronous requests and are optimized for real-time client applications that update a few records at a time. You can use both of these APIs for processing many records, but when the data sets contain hundreds of thousands of records, they’re less practical. Bulk API’s asynchronous framework is designed to make it simple and efficient to process data from a few thousand to millions of records.
The easiest way to use Bulk API is to enable it for processing records in Data Loader using CSV files. With Data Loader, you don’t have to write your own client app. Sometimes, though, unique requirements necessitate writing a custom app. Bulk API lets you take the ship’s wheel into your own hands and steer the course toward a solution that works for you.
For this unit, you use a newer version of Bulk API called Bulk API 2.0. If you want to apply the things you learn in this unit to the previous, still supported version of Bulk API, you need to use different resource URIs, and create and manage batches as well as jobs. For more information on the previous version of Bulk API see Bulk API Developer Guide.
Import Data to Your Org
To explore Bulk API, we’ll use Workbench to create some account records.
Create a Bulk Job
Bulk API is REST-based, so we can use Workbench’s REST Explorer to make Bulk API requests.
- Log in to your Trailhead Playground and navigate to Workbench.
- For Environment, select Production. For API Version, select the highest available number. Make sure that you select I agree to the terms of service.
- Click Login with Salesforce.
- In the top menu, select utilities | REST Explorer.
Now we’re ready to upload our data. The first step is to create a job. A job specifies the type of operation and data object we’re working with. It functions as a bucket into which we add data for processing.
We’ll use the /jobs/ingest resource to create a job. This resource can also be used to get a list of current jobs.
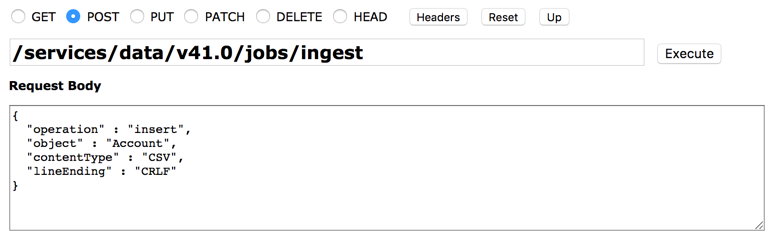
To create a job, we submit a POST request to /jobs/ingest with the job’s properties in the request body. Because Bulk API is REST-based, the request takes the familiar form of a REST request with four components: URI, HTTP method, headers, and body. The method is POST, as we just mentioned.For the URI, replace the text in the URI text box with the following: /services/data/vXX.0/jobs/ingest, where XX.0 corresponds to the API version you’re using. Let’s note a few things about this URI.
- We’re using /services/data, which is the same endpoint used for the REST API. Bulk API uses the same framework that the REST API uses, which means that Bulk API supports many of the same features, such as OAuth authentication.
- /jobs/ingest indicates that we’re accessing the resource for creating Bulk API jobs.
For the request body, copy and paste the following text.
{
  "operation" : "insert",
  "object" : "Account",
  "contentType" : "CSV",
  "lineEnding" : "CRLF"
}These properties indicate that we want to use the insert operation on the data we submit to the job. We’re submitting account data, and it’s in CSV format. Bulk API supports payloads in CSV.
Your REST Explorer looks something like this.
Click Execute and check out the response.

The response includes all sorts of properties about the job, most of which aren’t useful to us right now because we haven’t added data yet. Although we want to note a few properties. Look at the job ID (id) and copy it into a text file. We use it to add data to the job and check in on the job’s status. Also examine the state property. When you create a job, it’s immediately set to the Open state. That means it’s ready to start receiving data. Finally, look at the contentUrl property. This property shows the URL that we use to load data for the job.
Add Data to the Job
Now we can insert account data to our job. Data for a job is sent to the server as a set of records in a PUT request. The server processes the set of records, determining the optimal way to load the data into Salesforce. All you have to do is upload the data.
Create a new request in Workbench. Replace the text in the URI text box with the following: /services/data/vXX.0/jobs/ingest/jobID/batches. Replace jobID with the job ID you copied. For the HTTP method, select PUT.For this example, we’re adding a set of records with only four accounts. Usually, you use Bulk API to add thousands or millions of records, but the principle is the same. Copy the following CSV text into the request body.
"Name"
"Sample Bulk API Account 1"
"Sample Bulk API Account 2"
"Sample Bulk API Account 3"
"Sample Bulk API Account 4"We’re using CSV data because that’s what we specified when we created the job.
Click Headers and change Content-Type to text/csv. Your request looks something like this.

Click Execute.
The response contains just a status code of 201 (Created), which indicates that Salesforce successfully received the job data.
Close the Job
Now that we’ve submitted our data, we need to let Salesforce know that it’s time to process the data. Do this by changing the job state from Open to UploadComplete.Replace the text in the URI text box with the following: /services/data/vXX.0/jobs/ingest/jobID. Again, replace XX with the API version you’re using, and replace jobID with the job’s ID. For the HTTP method, select PATCH. Click Headers and set Content-Type to application/json. In the request body, replace the text with the following JSON text.
{
   "state" : "UploadComplete"
}Click Execute. The response contains job status information. The state property indicates that the job state is UploadComplete. At this point, Salesforce starts processing the job.
Check the Status of the Job
We’ve submitted our data. We’ve let Salesforce know we’re done uploading data. Now it’s up to the server to process the request. We can monitor the server’s progress by checking the status of the job through the API or through the Salesforce UI. In Salesforce, from Setup, enter Bulk Data Load Jobs in the Quick Find box, then select Bulk Data Load Jobs. You can check the status of a job on this page. Or, you can click a job ID to check the status and get detailed results for that job.
In the API, we use the /jobs/ingest/jobID resource to monitor a job. Replace the text in the URI text box with the following: /services/data/vXX.0/jobs/ingest/jobID, with the usual replacements. For the HTTP method, select GET.
Click Execute. You see something like this.

If your state is still UploadComplete instead of JobComplete, Salesforce is still processing the job. Don’t worry, it’ll be processed in a few minutes. In the meantime, go treat yourself to a mug of grog and try the same request again when you get back. If you’re lucky and your job is already processed, continue on to retrieve the job results, or feel free to take a grog break anyway.
Get the Job Results
Once a job is in the JobComplete state (or Failed state) we can get results information in the form of successfully and unsuccessfully processed records.
Let’s look at the successfully processed records first. In Workbench’s REST explorer, replace the text in the URI text box with the following: /services/data/vXX.0/jobs/ingest/jobID/successfulResults, with the usual replacements. For the HTTP method, select GET.
Click Execute. You see something like this.

Salesforce returns a CSV that contains a list of all the records in the job that were successfully processed. In this module, we created several Account records. The CSV data contains the record ID of the created record, and a value of true for the sf__Created column.
Occasionally some records can’t be processed. Maybe the job tried to create Account records that already existed. Maybe the job data was missing some required fields. In these scenarios, we can ask Salesforce for a list of records that had an error during processing, along with more information on what went wrong.
Back in the REST explorer, replace the text in the URI text box with the following: /services/data/vXX.0/jobs/ingest/jobID/failedResults, with the usual replacements. For the HTTP method, select GET.
Click Execute. The results look something like this.

Salesforce provides a CSV that contains a list of records that encountered errors during processing, along with the record ID and the error message. In this case, all your records were successfully inserted, so the list of records is empty. Tidy work, captain!